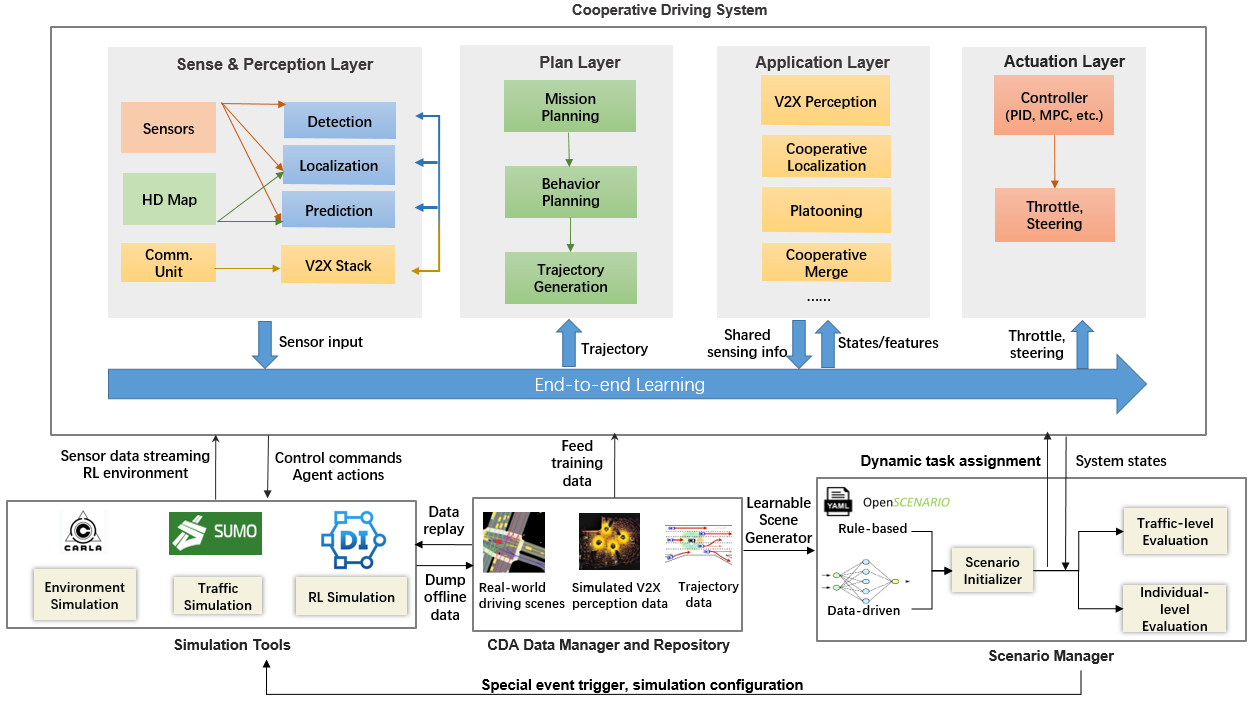
# 定制化  由于OpenCDA的高度模块化,您可以方便地用自己的算法替换任何默认模块。定制的方法是将您定制的模块放在`opencda/customize/...`里面,并且使用继承来覆盖原有算法。然后在`VehicleManager`中导入你定制的算法即可。如果你想要修改单个模块你所需要做的事情就是保证修改后的模块和原有的模块的输入输出格式保持一致。此外,对于Control算法模块的修改并不是在`opencda/customize/...` 里面,而是在原来的`opencda/core/acutation/` 下面介绍各个模块都是如何进行算法的定制化开发的。 ## ****Localization Customization**** `LocalizationManager` 负责定位任务。在初始化阶段,将生成的GPS和IMU传感器来收集定位相关的信息。 里面的核心功能是`localize()` ,这个方法没有任何的输入,他主要的作用是为了`self._ego_pos` 和`_speed` 提供正确的值。 融合 GPS 和 IMU 数据的默认算法是卡尔曼滤波器(Kalman Filter),它以当前的gps和imu数据为输入,然后返回修正后的$(x, y, z)$坐标。 ```python # opencda/core/sensing/localization/localization_manager.py:line 142 from opencda.core.sensing.localization.kalman_filter import KalmanFilter class LocalizationManager(object): def __init__(self, vehicle, config_yaml, carla_map): self.kf = KalmanFilter(self.dt) def localize(self): ... corrected_cords = self.kf(x, y, z, speed, yaw, imu_yaw_rate) ``` 如果用户想要保留定位的整个结构而只更换滤波器(例如扩展卡尔曼滤波器),然后他只需要创建一个在 `opencda/customize/core/sensing/localization`目录下创建一个 `localization_manager.py` 。并且在`CustomizedLocalizationManager` 中初始化的时候加入拓展卡尔曼滤波器。 ```python # opencda/customize/core/sensing/localization/localization_manager.py:line 0 from opencda.core.sensing.localization.localization_manager import LocalizationManager from opencda.customize.core.sensing.localization.extented_kalman_filter import ExtentedKalmanFilter class CustomizedLocalizationManager(LocalizationManager): def __init__(self, vehicle, config_yaml, carla_map): super(CustomizedLocalizationManager, self).__init__(vehicle, config_yaml, carla_map) self.kf = ExtentedKalmanFilter(self.dt) ``` 然后去`VehicleManger` 类里面导入自定义模块并且设置其启用: ```python from opencda.core.sensing.localization.localization_manager import LocalizationManager from opencda.customize.core.sensing.localization.localization_manager import CustomizedLocalizationManager class VehicleManager(object): def __init__(self, vehicle, config_yaml, application, carla_map, cav_world): # self.localizer = LocalizationManager(vehicle, sensing_config['localization'], carla_map) self.localizer = CustomizedLocalizationManager(vehicle, sensing_config['localization'], carla_map) ``` 如果您想修改的更多,比如改变数据预处理等。只需要在 `CustomizedLocalizationManager` 中填充`localize()` 中的`self._ego_gps` 和`self._speed` 不会对下游模块造成任何问题。 ## ****Perception Customization**** `PerceptionManager` 负责感知相关的任务。现在它支持车辆检测和交通信号灯检测。核心方法`detect(ego_pos)` 将定位模块的ego_car的自我位置作为输入,返回值是一个`objects` 字典,这个字典的key是对象的类别,值是该类别中世界坐标系下每个对象的属性(比如三维姿态等)。 要定义您自己的目标检测算法,请在`opencda/customize/core/sensing/perception/` 文件夹下面创建一个`perception_manager.py` 文件。这里的核心就是你的`your_algorithm(rgb_images, lidar_data)` 他的输入是获取的图像信息和激光雷达点云信息。 ```python import cv2 from opencda.core.sensing.perception.perception_manager import PerceptionManager from opencda.core.sensing.perception.obstacle_vehicle import ObstacleVehicle from opencda.core.sensing.perception.static_obstacle import TrafficLight class CustomziedPeceptionManager(PerceptionManager): def __init__(self, vehicle, config_yaml, cav_world, data_dump=False): super(CustomizedLocalizationManager, self).__init__(vehicle, config_yaml, cav_world, data_dump) def detect(self, ego_pos): objects = {'vehicles': [], 'traffic_lights': [], 'other_objects_you_wanna_add' : []} # retrieve current rgb images from all cameras rgb_images = [] for rgb_camera in self.rgb_camera: while rgb_camera.image is None: continue rgb_images.append(cv2.cvtColor(np.array(rgb_camera.image), cv2.COLOR_BGR2RGB)) # retrieve lidar data from the sensor lidar_data = self.lidar.data ######################################## # this is where you put your algorithm # ######################################## objects = your_algorithm(rgb_images, lidar_data) assert type(objects['vehicles']) == ObstacleVehicle assert type(objects['traffic_lights']) == TrafficLight return objects ``` ## ****Behavior Planning Customization**** 在仿真运行期间,`BehaviorAgent` 首先会通过函数`update_information`保存从`PerceptionManager` 和`LocalizationManager` 中获得的ego vehicle的位置、速度和周围物体信息。之后`BehaviorAgent` 将会调用函数`run_step()` 执行单步,并返回`target_speed` 和`target_location` 信息。 您要定义自己的行为规划算法。请在`opencda/customize/core/plan/` 文件夹下创建`behavior_agent.py`文件。 ```python import carla.libcarla from opencda.core.plan.behavior_agent import BehaviorAgent class CustomizedBehaviorAgent(BehaviorAgent): def __init__(self, vehicle, carla_map, config_yaml): ... def update_information(self, ego_pos, ego_speed, objects): ######################################## # this is where you put your algorithm # ######################################## do_some_preprocessing(ego_pos, ego_speed, objects) def run_step(self): ######################################## # this is where you put your algorithm # ######################################## target_speed, target_loc = your_plan_algorithm() assert type(target_speed) == float assert type(target_loc) == carla.Location return target_speed, target_loc ``` ## ****Control Customization**** 和`BehaviorAgent, ControlManger`类似,首先通过`update_info()` 函数保存ego vehicle的位置信息,然后通过`run_step()` 获取`BehaviorAgent`生成的`target_speed` 和`target_loc` 信息,生成最终的指令。 与其他模块不同,ControlManager更像是一个抽象类,它提供了调用相应控制器(默认pid控制器)的接口。 ```python import importlib class ControlManager(object): def __init__(self, control_config): controller_type = control_config['type'] controller = getattr( importlib.import_module( "opencda.core.actuation.%s" % controller_type), 'Controller') self.controller = controller(control_config['args']) def update_info(self, ego_pos, ego_speed): """ Update ego vehicle information for controller. """ self.controller.update_info(ego_pos, ego_speed) def run_step(self, target_speed, target_loc): """ Execute current controller step. """ control_command = self.controller.run_step(target_speed, waypoint) return control_command ``` 因此,如果你想使用 pid 控制器以外的控制器,你可以在 `opencda/core/acutation/`文件夹下创建`customize_controller.py`,并遵循相同的输入和输出数据格式: ```python class CustomizeController: def update_info(self, ego_pos, ego_spd): ######################################## # this is where you put your algorithm # ######################################## do_some_process(ego_pos, ego_spd) def run_step(self, target_speed, target_loc): ######################################## # this is where you put your algorithm # ######################################## control_command = control(target_speed, target_loc) assert control_command == carla.libcarla.VehicleControl return control_command ``` 然后将控制器的名称放入 yaml 文件中: ```yaml vehicle_base: controller: type: customize_controller # this has to be exactly the same name as the controller py file args: ...... ``` 最后修改:2023 年 08 月 03 日 © 允许规范转载 打赏 赞赏作者 支付宝微信 赞 2 如果觉得我的文章对你有用,请随意赞赏